


In this article, we’ll walk through a little journey on how Dockerfile generates an image. It’s not going to be about the basics of Dockerfile. You and I will try to understand what is going on under the hood when we build an image from Dockerfile.
Before going through that journey, let’s put some weapons into our arsenal:
Image: Single file that contains dependencies and configurations required to run a program
Container: Running instance of an image
Let’s create a simple image
We’re going to create a simple and not that meaningful Dockerfile.
# Step 1: Specify base image
FROM alpine

# Step 2: Download and install dependency
RUN apk add — update redis

# Step 3: Tell the image what to do when it starts as container
CMD [“redis-server”]
In the code above,
- We say Dockerfile that uses Linux alpine image as a base image
- Onto the base image, run the command which will install Redis
- And finally, use the CMD command when we run that container
Build Image From Dockerfile
Here’s the section where we’re going to see what is actually happening when we try to create an image from Dockerfile.
Open your terminal and run the example Dockerfile. To run the command, be sure that you’re in the same place where Dockerfile exists, and then run the following command:
docker build .
If you do that you’ll see an output as shown below:
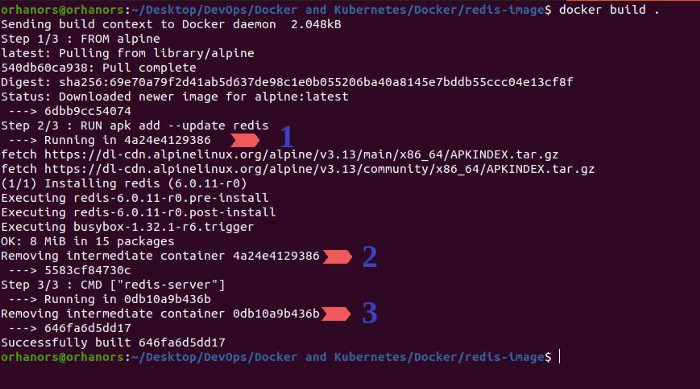
Before going any further, keep in mind that:
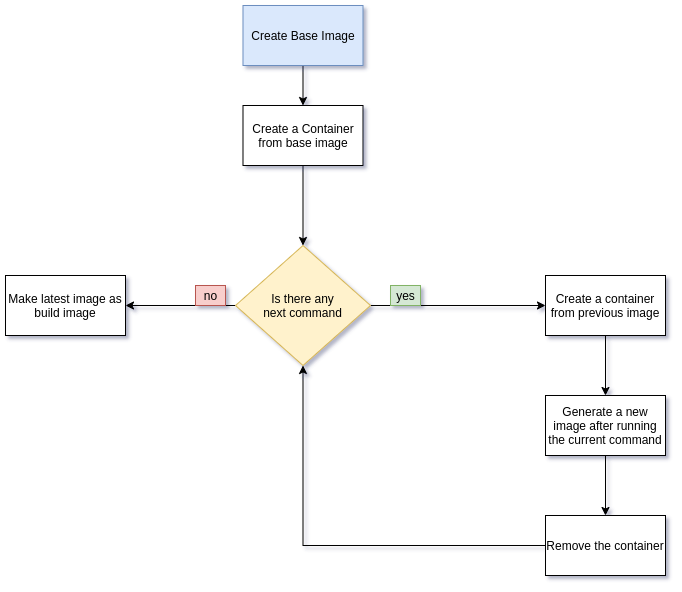
When you run the docker build command docker starts from the base image. After creating the base image, for each command, it creates a container from the current image and runs the next command inside of that container.
Let’s try to understand the points in the image above:
Step 1/3:
Docker installs the base image which is a lightweight Linux image name alpine
Step 2/3:
- In step 1, Docker creates a container from the alpine image. Inside of that container, it runs the apk add — update redis command. This command installs Redis onto the existing container which is a Linux container. So it’s kind of installing Redis to our Linux distribution.
- After installing Redis onto our existing image docker removes the container that was previously created and creates a new image.
Step 3/3:
3. In step 3, Docker does the same things again. It creates a new container according to the previous step’s image. When it’s done with that image it removes the running container and checks if there’s a next command. If yes, it goes to the next step with the latest image that was created in the related step. If not, it builds the docker image from the latest step’s image.
Caching in Docker
I want you to do a very simple thing now. Run the following command again:
docker build .
You’ll see that the output of the build command will be slightly different than the first one. Here’s the output of the second time running of the build command:
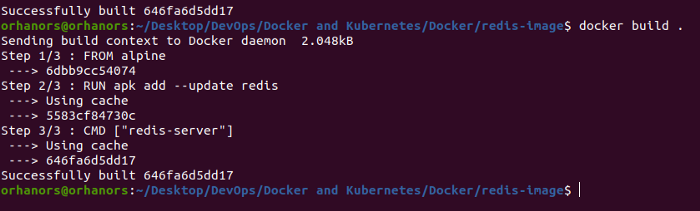
Take a closer look at Step 2/3 and Step 3/3. Instead of doing some operations with the command it just says “Using cache”. This means that when you re-run the same commands with docker it first checks if the result exists in the cache. If it exists docker uses it and this makes the docker build process extremely fast.
Conclusion
Throughout this article, I’ve tried to explain the internal behavior of the docker build command. It’s nice to know the underlying behavior of the technology that is used often. I hope you enjoyed it 😎